
Bathroom Rescue; Health Hazard To Homely Haven
- Robert Forsyth
- Aug 30, 2025
- 5 min read

Where do I start? That’s the question I usually ask myself when beginning any job. But this question felt even more relevant when renovating this bathroom.

The previous person who butchered this renovation was originally called in to plaster the walls as a favour. Instead, they brute-forced their way into completing the whole job for an inflated price. Rather than plastering the walls, they decided to wallpaper them, then paint the lumpy abomination with non-bathroom rated paint. This trapped damp within the wallpaper that lead to black mould (a form of mould that can cause headaches, dizziness, memory problems, and fatigue also tinnitus in some cases) . On top of that, they applied wooden decorative strips (yes, on top of the patch-worked wallpaper). Not a huge issue in itself—until you realised that the previous attempt at refurbishment had been carried out by someone who described themselves as a fibrous plasterer (a professional who makes fine detailed plaster mouldings to attach to walls on prestigious buildings).

The walls, ironically, were the least of the problems and not an issue for me to fix as I can plaster very well . The main point of contention was the bamboo flooring. This type of flooring is not rated for a bathroom. In other words, the quality was so poor that it started swelling almost immediately after being fitted. Somehow, the degenerate managed to install it without gluing properly (if it was glued, it wasn’t waterproof) or nailing the planks. This caused the area just outside the shower door to separate from the rest of the floor. The rot and swelling were exacerbated by condensation on the toilet, which in turn caused the flooring to decay further. As a result, a damp, smell began lingering only a few months after it was fitted.
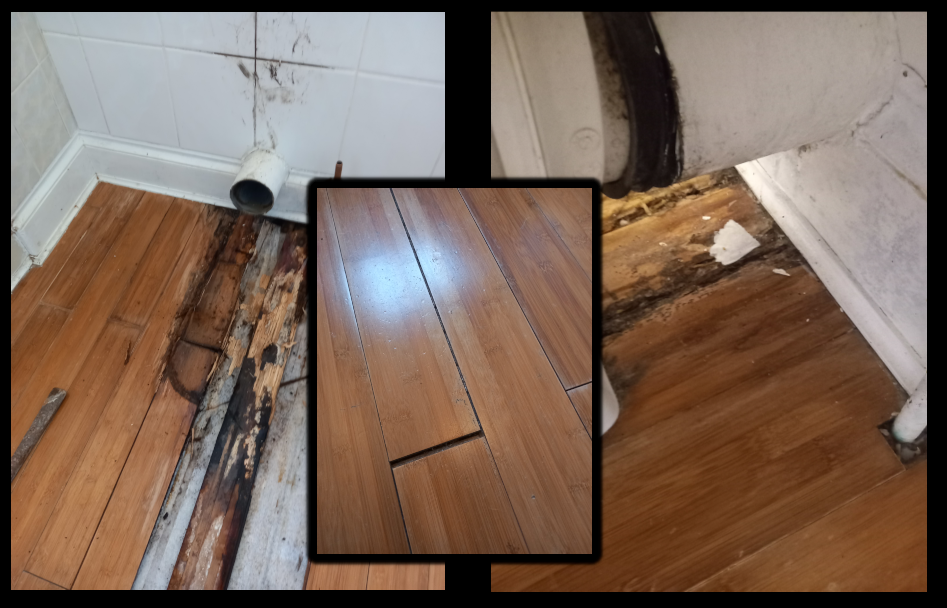
The next major issue was the sink. When the ‘under-skilled’ and ‘over-confident’ nincompoop took over the bathroom installation, they didn’t even glue the pipework together (a simple task that happens in every bathroom instillation in the uk). This caused a leak that wasn’t addressed for years, further embedding the smell of damp into the house.

Lastly, even though this was outside the scope of the original installation, I decided to take the executive decision and replace the shower cubicle (first picture). The shower was over 25 years old by this point and not been replaced (thankfully) by the previous installer. Some of the tiles were cracked too. This meant that all the tiles would match, creating a harmonious design throughout the space.
When I first sat down to write this, I typed “where do I start” at the top of the page. That was mainly for effect. I already knew where to start: rip the whole abomination out, let the walls dry, and begin again.
It was at this point that I designed the bathroom using B&Q’s range of products. I went with them because it is the closest shop that still sells bathroom supplies in store. It seems most bathroom suppliers are “showrooms” these days, meaning they don’t actually stock much, but instead they order it in on demand and inflate the prices. Regardless of that frustration I eventually chose:
Tiles
More tiles
Adhesive
Grout
Bathroom door
Shower tray
I also realised the bolts holding the cistern to the pan were rusted solid, so I bought a newer model of toilet to replace it;
Toilet
After re-plastering the walls, using Hardwall and Multi finish I measured accurately the distance from where the top of the new flooring would be to the bottom of the second row of tiles. This allowed me to cut battens to length and screw them temporarily to the walls. They had to be very precise so as not to throw off the grout lines once tiling began. My trusty Stabila levels gave me a perfectly accurate line.
I tiled the walls using Mapei adhesive, paying particular attention to ensure the cut edges weren’t visible from the doorway. At roughly 1200mm above the floor I added a strip of small mosaic tiles, which I mirrored around the room. Behind the shower I used larger tiles in a similar pattern. I also added one decorative strip above the door, in keeping with the 1920s/30s character of the house—such embellishments were extremely popular then.
With the wall tiles in place (apart from the first row), I moved on to the floor. After confirming the joists were suitable, I screwed down a cementitious backer board. This eliminated any movement and created a solid substrate for the porcelain flagstone-style tiles I’d picked up cheaply. They were reduced because of chipped corners, which didn’t matter to me since I had a plan: cut off the damaged edges and inset the same patterned tiles used on the shower wall and above the door. The finished look gives the room a pleasing balance of traditional with a touch of modern—the slabs are also slightyl textured, so it reduces the chance of slipping when getting out of the shower. It think this technique creates a homely charm me and my partner were aiming for.


Normally I’d install the shower tray before laying the floor, but B&Q failed to deliver on time (two separate deliveries for one order—a rubbish service). So instead, I reworked the waste system, checking for leaks as I went. I then bedded the new 1100mm x 900mm tray onto a PVA, sand, and cement mix, sealing the trap with silicone. Having laid well over a thousand slabs in my time, this heavy, slab-like job was done quickly enough. I finished it by pointing the edges to give the corners strength. The last few tiles around the shower and floor edges went in after that.
I finished the room by painting the walls, attaching an oak trim I made using brass screws and, grouting the tiles. Then came the magic moment: reinstalling the bathroom ‘furniture’. In this case, that meant the toilet, toilet roll holder, towel rail, shower accoutrements and sink.
The magic moment I felt was a genuine sense of pride in what I had accomplished. Not arrogant hubristic pride, but the quiet satisfaction of knowing I had created something good—something my father would have appreciated, and knowing my partner can enjoy a relaxing shower in a cosy, welcoming space was the best feeling I could have. This also elevated my mood further, because now I am not embarrassed by the smell and visage that used to welcome visitors.


Comments